
Rubber Injection and Transfer Molding Process
Download the Guide to Rubber Molding Processes in PDF format
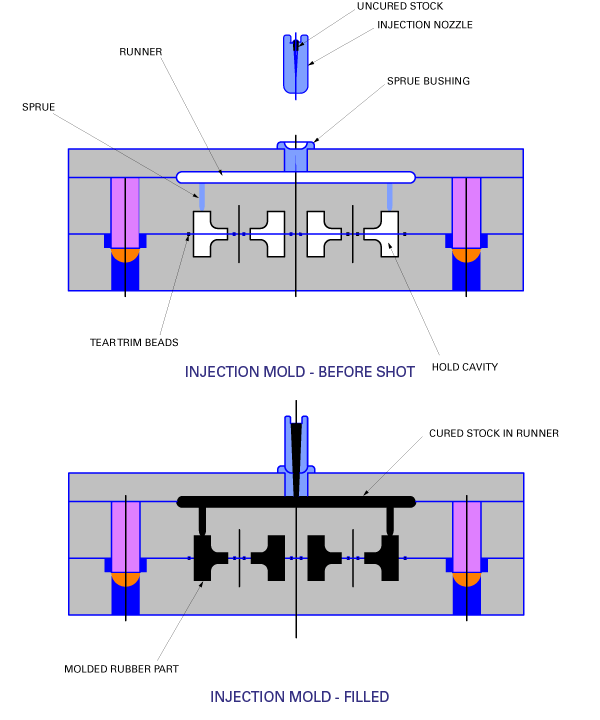
Rubber Injection Molding
Based off of a process intended for the molding of plastics, injection molding of rubber began in the mid 1960s. Rubber injection molding successfully alters the plastics process by heating the rubber and placing it under significantly more pressure per square inch of cavity surface in molding. This is different from the plastic injection molding process where the materials are cooled under less pressure. Through various innovations, injection molding has become one of the most efficient ways to create molded rubber products in many cases.
The process of injection and injection-transfer molding starts with efficient material preparation. To begin, the material is mixed in bulk and then stripped immediately into continuous approx. 1.25" wide & .375" strips. These strips are then fed into a screw which, in turn, fills a barrel with the appropriate predetermined amount of rubber material.
Advantages of injection molding:
- The complete elimination of pre-forms
- The production and need for pre-forms is a labor intensive step that can potentially affect the finished product through variability in pre-form weight and shape.
- Elimination of operator placement of pre-forms.
- Since pre-forms are eliminated, the need for operators to place the pre-forms in a cavity (compression molding) or pot (transfer molding) is removed.
- Injection screw pre-heats material before forcing it into cavities
- This process decreases the viscosity of the material, allowing it to flow more easily into the cavities.
- This pre-heating provides the potential for decreased cure times through
- More rapid cavity filling due to lower viscosity
- Material already being in the curing process through the heat added during screw charging and shear created during injection
- Reduced cycle time
- Flashless tooling
- Economical process for high volumes of medium to high precision components
- Capable of producing overmolded components
- Minimal material waste
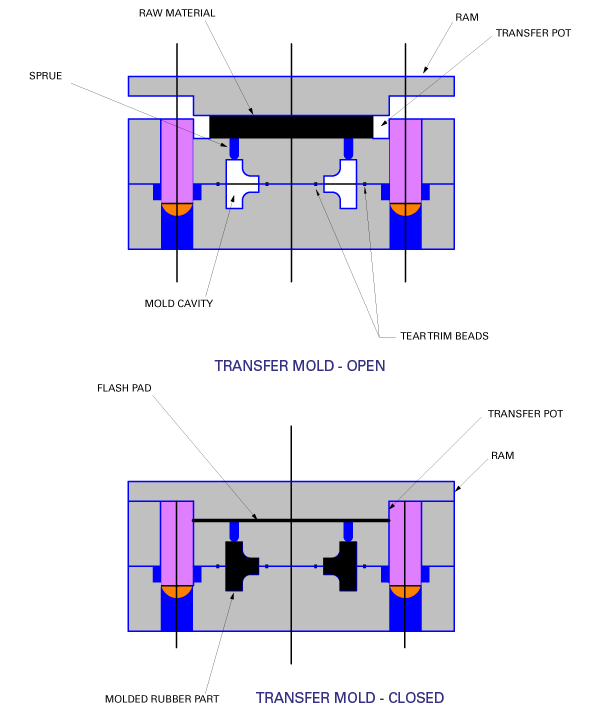
Transfer Molding
As with compression molding, transfer molding requires secondary raw material preparation into pre-forms. It differs, however, in the placement of these pre-forms into a "pot" located between the top plate and a plunger. When the pre-forms are placed into the pot, the mold is then closed and the material is compressed by the plunger and transferred through sprues into the cavity below.
Some possible advantages of transfer molding over compression molding can include:
- High Cavity Count - In many cases, transfer molded rubber products require fewer and simpler pre-forms. One pre-form can fill hundreds of cavities
- Cost effective tooling
- Tighter control of dimensional tolerance - the mold is not held open by excess material spilling out of the cavity parting line; all the excess hold the plunger open from the pot
- Economical process for medium to high precision components
- Color molded rubber parts benefit - pre-forms can be cut by hand from raw material, thus reducing the chance of contamination that can result from the mechanical prep of compression molding or the injection screw and barrel in injection molding.
- Capable of producing overmolded components
The primary disadvantage of transfer molding is found in the increase of waste or excess flash. This can be seen in the "flash pad" or the rubber left in the pot after the transfer is cured which can either be recycled or discarded.
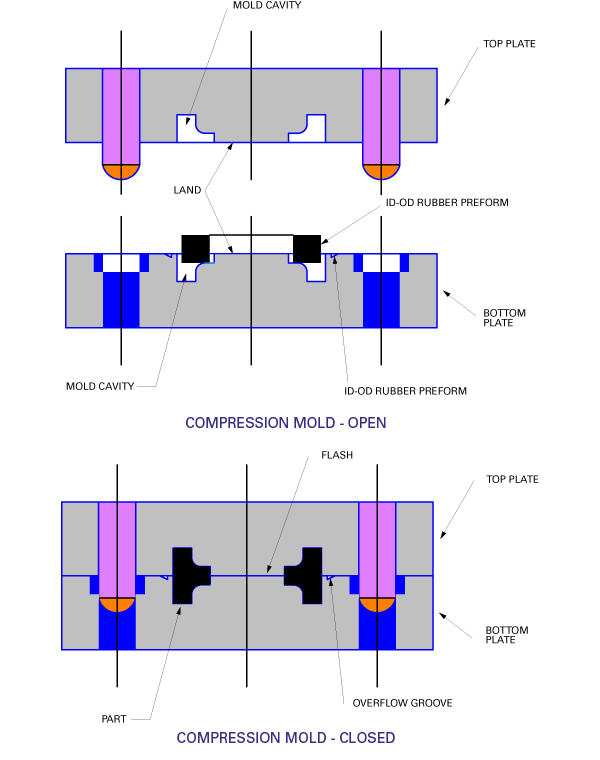
Compression Molding
Compression molding is a process that involves taking a rubber compound or mixed raw material and creating "pre-forms" in the basic shape of the end product. The pre-forms provide a surplus of material to be placed in the cavity, thus ensuring a total cavity fill. Once in place, the mold is then closed, applying both heat and pressure to the pre-form and allowing it to fill the cavity. When the cavity is filled, excess pre-form material spills out into overflow grooves. Following this step the rubber is then demolded, usually by hand, leaving us with the molded rubber product.
Compression molding is often chosen for medium hardness compounds in low volume production or in applications requiring particularly expensive materials. This process helps to minimize the amount of overflow, or flash created during the rubber molding process.
In creating compression molded rubber products, the pre-forms can be difficult to insert into more complex mold designs. Furthermore, the compression molding process does not lend itself well to the material flow requirement of harder rubber compounds.
Benefits of Compression Molding
- Cost effective tooling
- Maximized cavity count
- Economical process for medium precision
Compression molding can be a cost effective solution in situations where:
- The tooling already exists
- The cross-section of the part is very large and requires a long cure time
Applications of compression molding range from simple o-ring drive belts to complex brake diaphragms with diameters of more than 10 inches. Timco can also offer a variety of other molded rubber products through compression molding.
Deflashing
Removal of the waste edge, or flash, from a molded rubber productcan be accomplished in a number of ways. Depending on the material, part size, tolerance and quantity deflashing methods commonly include:
- Manual tear trimming
- Cryogenic processing
- Tumbling
- Precision grinding